
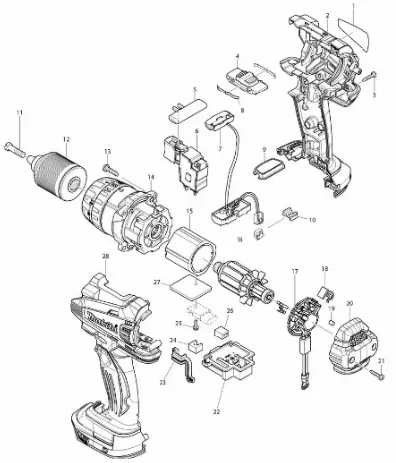
If you need to repair a Makita power tool, finding the correct replacement component can sometimes be confusing. Makita parts diagrams make the process much easier by showing how the individual components of a tool fit together and providing a reference number for each part.
Whether you're looking for a bearing, switch, gear, armature, carbon brush or another component, learning how to read a Makita parts diagram can help you identify exactly what you need before ordering your Makita spare parts.
Click here to jump straight to all of our Makita Parts Diagrams
A Makita parts diagram, sometimes called an exploded diagram or exploded view, is a detailed illustration showing the individual components that make up a power tool.
Instead of showing the tool fully assembled, the components are separated visually. This allows you to see where each part fits and how the different components relate to one another.
A typical Makita parts diagram will show:
These diagrams are particularly useful when you're trying to identify a component that you don't know the name of.
One of the most important things to understand is that there are usually two different types of numbers associated with the diagram.
The number shown next to a component in the exploded diagram is normally an item or reference number.
For example, you might see numbers such as:
1, 2, 3, 4, 5, 6...
These numbers correspond to the parts list underneath or alongside the diagram.
The reference number tells you where to look in the parts list. It isn't necessarily the number you should use when ordering the replacement part.
The parts list will normally contain the actual Makita part number associated with each component.
For example, a parts list might contain information similar to:
| Item | Description | Part Number |
|---|---|---|
| 1 | Housing | XXXXXXXX |
| 2 | Bearing | XXXXXXXX |
| 3 | Gear | XXXXXXXX |
| 4 | Switch | XXXXXXXX |
The part number is the important number to use when searching for your replacement.
If you find the component you need on the diagram, note its item number and then locate that same number in the corresponding parts list.
Finding a replacement part using a Makita exploded diagram is usually straightforward once you understand the process.
Start by finding the model number of your Makita tool.
The model number is usually printed on a label or rating plate on the tool. Depending on the machine, it may also be printed directly onto the housing.
It's important to identify the complete model number because similar-looking Makita tools can use different components.
Once you know your model, find the appropriate Makita parts diagram for that machine.
Make sure the diagram matches the exact model and version of your tool.
For example, don't automatically assume that a diagram for one version of a tool will apply to another version simply because the tools look identical.
Look through the exploded diagram and identify the component you need.
You don't necessarily need to know the technical name of the part. If you know what it looks like or where it is located inside the tool, the diagram can often help you identify it.
Once you've found the component, make a note of the reference number shown next to it.
For example, the diagram might show a bearing next to reference number 23.
You would then look for item 23 in the parts list.
The corresponding entry in the parts list should provide the actual Makita part number.
This is the number you can use to search for the Makita spare part online.
Searching by the exact part number is often the quickest way to find the correct replacement.
Makita manufactures a large range of power tools, and many components can look very similar.
A bearing, switch, gear or screw may appear almost identical to another component but have a different specification.
Using the correct Makita part number helps reduce the risk of ordering the wrong replacement.
It's especially important when repairing older tools, as components can sometimes be superseded or replaced by a newer part number.
Sometimes the part number shown on an older Makita parts diagram may no longer be the number used for ordering.
A component may have been discontinued and replaced by an updated part.
This is known as a superseded part.
If this happens, the original part number may lead you to a newer replacement number. Always check the compatibility information before ordering if you're unsure.
Parts lists can also show the quantity of a particular component used in the tool.
For example, a bearing may have a quantity of 2, meaning two of the same bearing are used in that particular assembly.
This doesn't necessarily mean you need to order two.
If you are replacing only one damaged component, check how many you actually require before placing your order.
You may notice the same component appearing in different locations or assemblies.
This is normal.
For example, a particular type of screw, bearing or washer may be used in several places within the same machine.
The diagram and parts list should help you determine the correct quantity and location.
Makita tools can remain in workshops for many years, and finding parts for an older machine can sometimes be difficult.
This is where an exploded diagram can be particularly useful.
Even if you don't know the name of the component, you can often identify it visually using the diagram and then use the corresponding part number to search for Makita replacement parts online.
Before ordering, however, check that the part is compatible with your exact model.
A parts diagram can help you identify a huge range of components, including:
If you are unsure what a particular component is called, the diagram can provide the reference you need to find its part number.
Before ordering your replacement, it's worth checking a few things:
Check the model number: Make sure the diagram relates to your exact Makita tool.
Check the part number: Use the part number from the parts list rather than relying solely on the item's appearance.
Check compatibility: Make sure the replacement is listed as compatible with your tool.
Check quantities: Some components are used multiple times within a machine.
Check for superseded parts: Older part numbers may have been replaced with newer versions.
Keep your old part: If possible, keep the original component until you've confirmed you've identified the correct replacement.
Once you've learned how to read a Makita parts diagram, finding the correct replacement becomes much easier.
Identify your tool model, find the appropriate exploded diagram, locate the component you need and note its reference number. You can then use the parts list to find the corresponding Makita part number and search for the replacement.
Whether you're repairing a drill, grinder, circular saw, mitre saw, planer or another Makita power tool, a parts diagram can be an invaluable resource.
If you're looking for Makita spare parts, searching by the exact Makita part number is one of the simplest ways to find the correct component and get your tool back up and running.


